Difference between revisions of "Manual:Navigation Computer"
(→Navigation Computer) |
m ([vega-bot] [replace] 17 instances of 'http://vegastrike.sourceforge.net/forums' for 'http://forums.vega-strike.org') |
||
| (47 intermediate revisions by 13 users not shown) | |||
| Line 1: | Line 1: | ||
| + | {{Languages|En|Manual:Navigation Computer}} | ||
{{NAV_Manual | | {{NAV_Manual | | ||
| − | | previous=[[Manual: | + | | previous=[[Manual:Map Mode|Map Mode]] |
| − | | up=[[Manual]] | + | | up=[[Manual#Inflight|Manual]] |
| − | | next=[[Manual: | + | | next=[[Manual:Communication|Communication]] |
}} | }} | ||
---- | ---- | ||
| − | + | =INTERSTELLAR MAP= | |
| + | <table style="float:right;"><tr><td>[http://forums.vega-strike.org/cpg/albums/wiki_manual/normal_flightcomp_map_2d.png http://forums.vega-strike.org/cpg/albums/wiki_manual/thumb_flightcomp_map_2d.png] | ||
| + | </td></tr></table> | ||
| − | + | Use the '''[Up]''' button to see the sector map. | |
| − | + | Use the '''[Down]''' button to return to the system map. | |
| − | + | Use the scroll wheel to zoom in and out. | |
| − | + | Click and drag to move the map. | |
| − | = | + | =INFO= |
| + | <table style="float:right;"><tr><td>[http://forums.vega-strike.org/cpg/albums//wiki_manual/flightcomp_info_mission.png http://forums.vega-strike.org/cpg/albums/wiki_manual/thumb_flightcomp_info_mission.png] | ||
| + | </td></tr></table> | ||
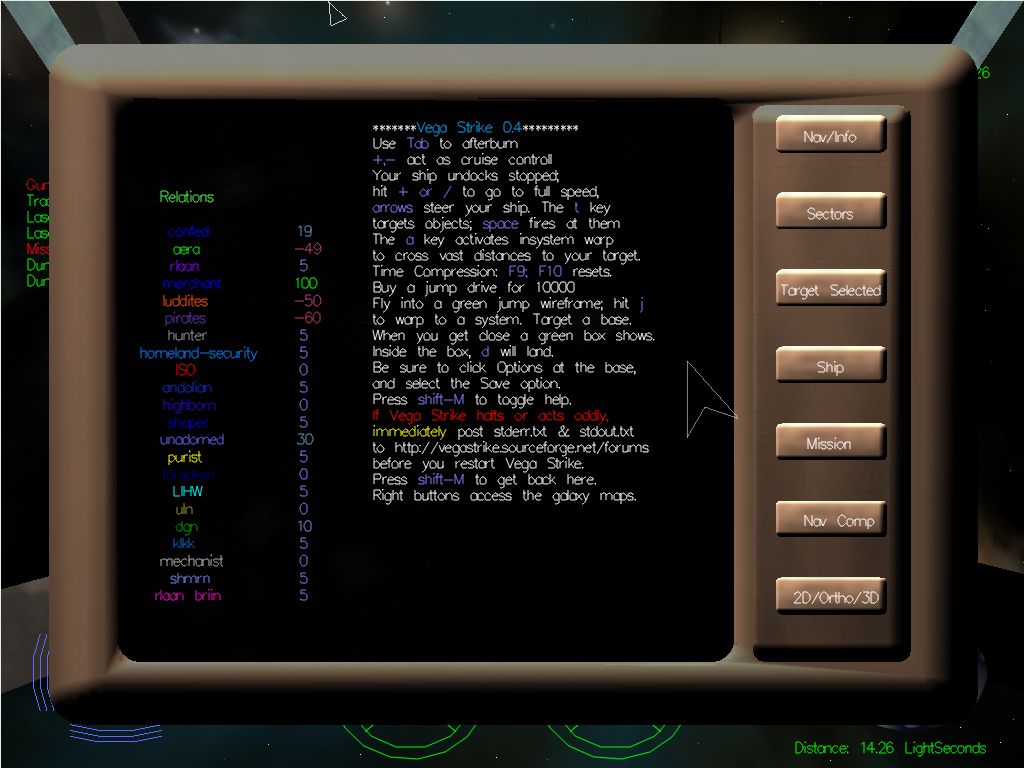
| − | + | The info screen is toggled by the '''[Nav/Info]''' button, then selecting '''[Mission]'''. | |
| − | + | On the left-hand side, it will show a list of all factions printed in their colors, and your current relation to them. | |
| − | |||
| − | == | + | =NAVIGATION COMPUTER= |
| + | <table style="float:right;"><tr><td>[http://forums.vega-strike.org/cpg/albums//wiki_manual/flightcomp_info_ship.png http://forums.vega-strike.org/cpg/albums/wiki_manual/thumb_flightcomp_info_ship.png] | ||
| + | </td></tr></table> | ||
| − | + | So you want to get to the xxxxx System from yyyyy in the shortest number of jumps. Perhaps you'd like to avoid any [[Faction:Aera|Aera system]], and on the way visit an [[Manual:Planet_types#Oceanic|Oceanic planet]]. How do you do it? | |
| + | Introducing the Navigation Computer! With this powerful tool you can calculate your travel in the VegaStrike Universe while avoiding those unsavory systems, or perhaps you're interested in the wild side of life! | ||
| − | + | The Navigational Computer provides two advanced functions. '''List Mode''' will allow you to add, rename and delete paths, toggle path visibility. '''Edit Mode''' allows you to edit the specifics of a created path. Note that all newly created paths will have to be edited before they are useable. | |
| − | + | The Navigation Computer is accessed through the in-flight [[Manual:Map|Map Screen]]. Activate the [[Manual:Map|Map screen]] by pressing {{Key:EN:Shift left}} {{Key:EN:M}} and then select the '''[Nav Comp]''' button. | |
| − | + | {{Fixme}} ''Small buttons still needed for this. See [[VsWiki:Templates#Interface_buttons]]'' | |
| − | The last type of nodes | + | ==List Mode== |
| + | <table style="float:right;"><tr><td>[http://forums.vega-strike.org/cpg/wiki_manual/flightcomp_nav.png http://vegastrike.sourceforge.net/albums/wiki_manual/flightcomp_nav.thumb.png] | ||
| + | </td></tr></table> | ||
| + | |||
| + | List Mode allows you to add, rename and delete paths, as well as toggle the path visibility. | ||
| + | |||
| + | * '''[Add]''' Add a new path to be edited. | ||
| + | * '''[Edit]''' Access Edit Mode to edit a highlighted path. | ||
| + | * '''[Show]''' Display highlighted path in the Sector Map. | ||
| + | * '''[Show All]''' Display all listed paths in the Sector Map. | ||
| + | * '''[Show None]''' Do not display any paths in the Sector Map. | ||
| + | * '''[Rename]''' Rename highlighted path (enter new name). | ||
| + | * '''[Remove]''' Remove highlighted path from list. | ||
| + | |||
| + | * Up/Down = Scrolls listed paths ''(ED: currently disabled)''. | ||
| + | * Left Box = List of existing paths. | ||
| + | * Right Box = Information pertaining to the current selected path such as visibility, source & destination systems. | ||
| + | |||
| + | {{Fixme}} ''Small buttons still needed for this. See [[VsWiki:Templates#Interface_buttons]]'' | ||
| + | |||
| + | ==Edit Mode== | ||
| + | <table style="float:right;"><tr><td>[http://forums.vega-strike.org/cpg/wiki_manual/flightcomp_nav_add_new.png http://forums.vega-strike.org/cpg/albums/wiki_manual/thumb_flightcomp_nav_add_new.png] | ||
| + | </td></tr></table> | ||
| + | |||
| + | A source node and a destination node define each path the player creates. (Note: another way to think of nodes is points; any trip has a starting point and a finishing point). In most cases, the default source node (your current system) should be sufficient, but more complex searches with varying starting points are possible. Notice the box in the bottom right. That contains the node that you are currently building. When you are finished building the node (below), you can apply it to the path, either as a source node by pressing the '''[Source]''' button, or as a destination node by pressing the '''[Destination]''' button – with two exceptions discussed below. | ||
| + | |||
| + | The node you are creating appears in the bottom right box. There are three different types of nodes you can build: | ||
| + | |||
| + | === Adding a System Node === | ||
| + | <table style="float:right;"><tr><td>[http://forums.vega-strike.org/cpg/wiki_manual/flightcomp_nav_edit_system.png http://forums.vega-strike.org/cpg/albums/wiki_manual/thumb_flightcomp_nav_edit_system.png] | ||
| + | </td></tr></table> | ||
| + | These nodes correspond directly to specific systems. Press the '''[Current]''' button to use the current system (the current system always refers to the system your ship is in). The target system always refers to whatever system you have targeted in the Sector Map. The last option will always refer to the system named on the button. You can change the system named on the button by selecting a different system on the map. On the map, the system you are in has a red box around it, while the targeted system has a yellow box and the selected system a green one. | ||
| + | |||
| + | {{Fixme}} ''Small buttons still needed for this. See [[VsWiki:Templates#Interface_buttons]]'' | ||
| + | |||
| + | === Adding a Criteria Node === | ||
| + | <table style="float:right;"><tr><td>[http://forums.vega-strike.org/cpg/wiki_manual/flightcomp_nav_edit_criteria.png http://forums.vega-strike.org/cpg/albums/wiki_manual/thumb_flightcomp_nav_edit_criteria.png] | ||
| + | </td></tr></table> | ||
| + | These nodes do not refer to a specific system, but rather they will match up to any system meeting a certain criteria. The different criteria types are '''[Owned By]''', '''[Contains]''' and '''[Sector]'''. To add a criterion to the list, simply select a criteria type and then type in a value in the box. For example, if the node should match systems with a Refinery, select '''[Contains]''' and type Refinery in the box. Press '''[AND]''' to add it to the list. Remove criteria by highlighting and pressing the '''[Remove]''' button. | ||
| + | |||
| + | Two commands add additional criteria: '''[AND]''' and '''[OR]'''. Select your new criteria type and enter the value. Then select your pre-existing criteria, and press the appropriate function. You may also exclude criteria by selecting a pre-existing criteria and pressing '''[NOT]'''. This method allows you to select a destination as follows: '''CONTAINS (Refinery) AND NOT OWNEDBY (Nasty Evil Faction)'''. There's a lot of potential in these types of nodes. Note: Since these nodes do not refer to a specific system, they cannot be applied as source nodes. | ||
| + | |||
| + | {{Fixme}} ''Small buttons still needed for this. See [[VsWiki:Templates#Interface_buttons]]'' | ||
| + | |||
| + | === Adding a Chain Node === | ||
| + | <table style="float:right;"><tr><td>[http://forums.vega-strike.org/cpg/wiki_manual/flightcomp_nav_edit_chain.png http://forums.vega-strike.org/cpg/albums/wiki_manual/thumb_flightcomp_nav_edit_chain.png] | ||
| + | </td></tr></table> | ||
| + | These nodes refer to the solutions of other path searches. This is best explained through example: you have one search path (GreatSearch) - which takes you from system A to system B, but you then want to continue the path to system C. Chaining will create the route from A to B to C. This is done by using the destination of the first search as the starting point of the second search. First create and highlight your original path (GreatSearch), then select whether you want to copy the point from '''[Source]''', '''[Destination]''' or '''[All Points]'''. In this case you would select '''[Destination]'''. Then press '''[Chain]''' to create the node. | ||
| + | |||
| + | The '''[All Points]''' option might seem confusing at first, but imagine you have an existing route named (GoodPath), going from A to B. You also need to stop at an agricultural planet along the way. Create a new path (NewPath) and make the source node a Chain Node by selecting (GoodPath) and '''[All Points]''' option, clicking '''[Chain]''' to create the chain, and then '''[Source]''' to apply it to (NewPath). Then use a regular Criteria Node to supply the destination. Now you have a second path that represents the route to the closest agricultural planet along the way. It is similar to finding the closest hotel from the highway when you are planning a long road trip. | ||
| + | |||
| + | The second exception with applying nodes to paths is that the Navigation Computer checks Chain Nodes to ensure there are no cycles before applying a node. By way of example, you cannot create the following: Path A refers to Path B, which refers to Path C, which refers back to Path A; this would imply a cycle. If a cycle would be created, the navigation computer will simply refuse to apply the node to the path. | ||
| + | |||
| + | {{Fixme}} ''Small buttons still needed for this. See [[VsWiki:Templates#Interface_buttons]]'' | ||
| + | |||
| + | ==Displaying Your Calculated Paths== | ||
| + | <table style="float:right;"><tr><td>[http://forums.vega-strike.org/cpg/wiki_manual/flightcomp_map_3d_plottednav.png http://forums.vega-strike.org/cpg/albums/wiki_manual/thumb_flightcomp_map_3d_plottednav.png] | ||
| + | </td></tr></table> | ||
| + | So you've created a really great trip path. How do you follow it? Unlike accepted [[Manual:Computer:Mission_computer|missions]] which display the flight path in the [[Manual:HUD|HUD]], the trip paths are displayed through the in-flight [[Manual:Map|Map Screen]]. | ||
| + | |||
| + | For the created navigation path to be displayed in the in-flight [[Manual:Map|Map Screen]], the path must be selected as visible in the Navigation Computer. To make a path visible: | ||
| + | * Activate the Navigation Computer. Open the [[Manual:Map|Map screen]] by pressing {{Key:EN:Shift left}} {{Key:EN:M}} and then select the '''[Nav Comp]''' button. | ||
| + | * In [[Manual:Navigation_Computer#List_Mode|List Mode]], highlight the required path and push the '''[Show]''' button. To show all created paths, push the '''[Show All]''' button. | ||
| + | * Return to the in-flight [[Manual:Map|Map Screen]] and ensure that the map is in ''Sector'' Mode. Clicking on the '''[Path]''' button will toggle the visibility of the selected navigation path on and off. The selected path will be displayed in red. | ||
| + | |||
| + | {{Fixme}} ''Small buttons still needed for this. See [[VsWiki:Templates#Interface_buttons]]'' | ||
| + | |||
| + | =See also= | ||
---- | ---- | ||
{{NAV_Manual | | {{NAV_Manual | | ||
| − | | previous=[[Manual: | + | | previous=[[Manual:Map Mode|Map Mode]] |
| − | | up=[[Manual]] | + | | up=[[Manual#Inflight|Manual]] |
| − | | next=[[Manual: | + | | next=[[Manual:Communication|Communication]] |
}} | }} | ||
| − | [[Category:Manual|Navigation Computer]] | + | [[Category:Manual|Navigation Computer]] [[Category:Movement|Navigation Computer]] |
Latest revision as of 23:30, 8 January 2013
View this site in other languages: Deutsch – English – Français – Español – Polski – Italiano – Nederlands – Руccкий – 简体中文
| Communication |
Contents
INTERSTELLAR MAP

|
Use the [Up] button to see the sector map.
Use the [Down] button to return to the system map.
Use the scroll wheel to zoom in and out.
Click and drag to move the map.
INFO
|
The info screen is toggled by the [Nav/Info] button, then selecting [Mission].
On the left-hand side, it will show a list of all factions printed in their colors, and your current relation to them.
NAVIGATION COMPUTER

|
So you want to get to the xxxxx System from yyyyy in the shortest number of jumps. Perhaps you'd like to avoid any Aera system, and on the way visit an Oceanic planet. How do you do it?
Introducing the Navigation Computer! With this powerful tool you can calculate your travel in the VegaStrike Universe while avoiding those unsavory systems, or perhaps you're interested in the wild side of life!
The Navigational Computer provides two advanced functions. List Mode will allow you to add, rename and delete paths, toggle path visibility. Edit Mode allows you to edit the specifics of a created path. Note that all newly created paths will have to be edited before they are useable.
The Navigation Computer is accessed through the in-flight Map Screen. Activate the Map screen by pressing 
 and then select the [Nav Comp] button.
FIXME Small buttons still needed for this. See VsWiki:Templates#Interface_buttons
List Mode

|
List Mode allows you to add, rename and delete paths, as well as toggle the path visibility.
- [Add] Add a new path to be edited.
- [Edit] Access Edit Mode to edit a highlighted path.
- [Show] Display highlighted path in the Sector Map.
- [Show All] Display all listed paths in the Sector Map.
- [Show None] Do not display any paths in the Sector Map.
- [Rename] Rename highlighted path (enter new name).
- [Remove] Remove highlighted path from list.
- Up/Down = Scrolls listed paths (ED: currently disabled).
- Left Box = List of existing paths.
- Right Box = Information pertaining to the current selected path such as visibility, source & destination systems.
FIXME Small buttons still needed for this. See VsWiki:Templates#Interface_buttons
Edit Mode

|
A source node and a destination node define each path the player creates. (Note: another way to think of nodes is points; any trip has a starting point and a finishing point). In most cases, the default source node (your current system) should be sufficient, but more complex searches with varying starting points are possible. Notice the box in the bottom right. That contains the node that you are currently building. When you are finished building the node (below), you can apply it to the path, either as a source node by pressing the [Source] button, or as a destination node by pressing the [Destination] button – with two exceptions discussed below.
The node you are creating appears in the bottom right box. There are three different types of nodes you can build:
Adding a System Node

|
These nodes correspond directly to specific systems. Press the [Current] button to use the current system (the current system always refers to the system your ship is in). The target system always refers to whatever system you have targeted in the Sector Map. The last option will always refer to the system named on the button. You can change the system named on the button by selecting a different system on the map. On the map, the system you are in has a red box around it, while the targeted system has a yellow box and the selected system a green one.
FIXME Small buttons still needed for this. See VsWiki:Templates#Interface_buttons
Adding a Criteria Node

|
These nodes do not refer to a specific system, but rather they will match up to any system meeting a certain criteria. The different criteria types are [Owned By], [Contains] and [Sector]. To add a criterion to the list, simply select a criteria type and then type in a value in the box. For example, if the node should match systems with a Refinery, select [Contains] and type Refinery in the box. Press [AND] to add it to the list. Remove criteria by highlighting and pressing the [Remove] button.
Two commands add additional criteria: [AND] and [OR]. Select your new criteria type and enter the value. Then select your pre-existing criteria, and press the appropriate function. You may also exclude criteria by selecting a pre-existing criteria and pressing [NOT]. This method allows you to select a destination as follows: CONTAINS (Refinery) AND NOT OWNEDBY (Nasty Evil Faction). There's a lot of potential in these types of nodes. Note: Since these nodes do not refer to a specific system, they cannot be applied as source nodes.
FIXME Small buttons still needed for this. See VsWiki:Templates#Interface_buttons
Adding a Chain Node

|
These nodes refer to the solutions of other path searches. This is best explained through example: you have one search path (GreatSearch) - which takes you from system A to system B, but you then want to continue the path to system C. Chaining will create the route from A to B to C. This is done by using the destination of the first search as the starting point of the second search. First create and highlight your original path (GreatSearch), then select whether you want to copy the point from [Source], [Destination] or [All Points]. In this case you would select [Destination]. Then press [Chain] to create the node.
The [All Points] option might seem confusing at first, but imagine you have an existing route named (GoodPath), going from A to B. You also need to stop at an agricultural planet along the way. Create a new path (NewPath) and make the source node a Chain Node by selecting (GoodPath) and [All Points] option, clicking [Chain] to create the chain, and then [Source] to apply it to (NewPath). Then use a regular Criteria Node to supply the destination. Now you have a second path that represents the route to the closest agricultural planet along the way. It is similar to finding the closest hotel from the highway when you are planning a long road trip.
The second exception with applying nodes to paths is that the Navigation Computer checks Chain Nodes to ensure there are no cycles before applying a node. By way of example, you cannot create the following: Path A refers to Path B, which refers to Path C, which refers back to Path A; this would imply a cycle. If a cycle would be created, the navigation computer will simply refuse to apply the node to the path.
FIXME Small buttons still needed for this. See VsWiki:Templates#Interface_buttons
Displaying Your Calculated Paths

|
So you've created a really great trip path. How do you follow it? Unlike accepted missions which display the flight path in the HUD, the trip paths are displayed through the in-flight Map Screen.
For the created navigation path to be displayed in the in-flight Map Screen, the path must be selected as visible in the Navigation Computer. To make a path visible:
- Activate the Navigation Computer. Open the Map screen by pressing and then select the [Nav Comp] button.
- In List Mode, highlight the required path and push the [Show] button. To show all created paths, push the [Show All] button.
- Return to the in-flight Map Screen and ensure that the map is in Sector Mode. Clicking on the [Path] button will toggle the visibility of the selected navigation path on and off. The selected path will be displayed in red.
FIXME Small buttons still needed for this. See VsWiki:Templates#Interface_buttons
See also
| Communication |